


19 Jul Building a Saturn V rocket with tape and cardboard

I built a Saturn V rocket, y’all! Well, I had help from my sister and a Cub Scout pack — but still! Let me start from the beginning:
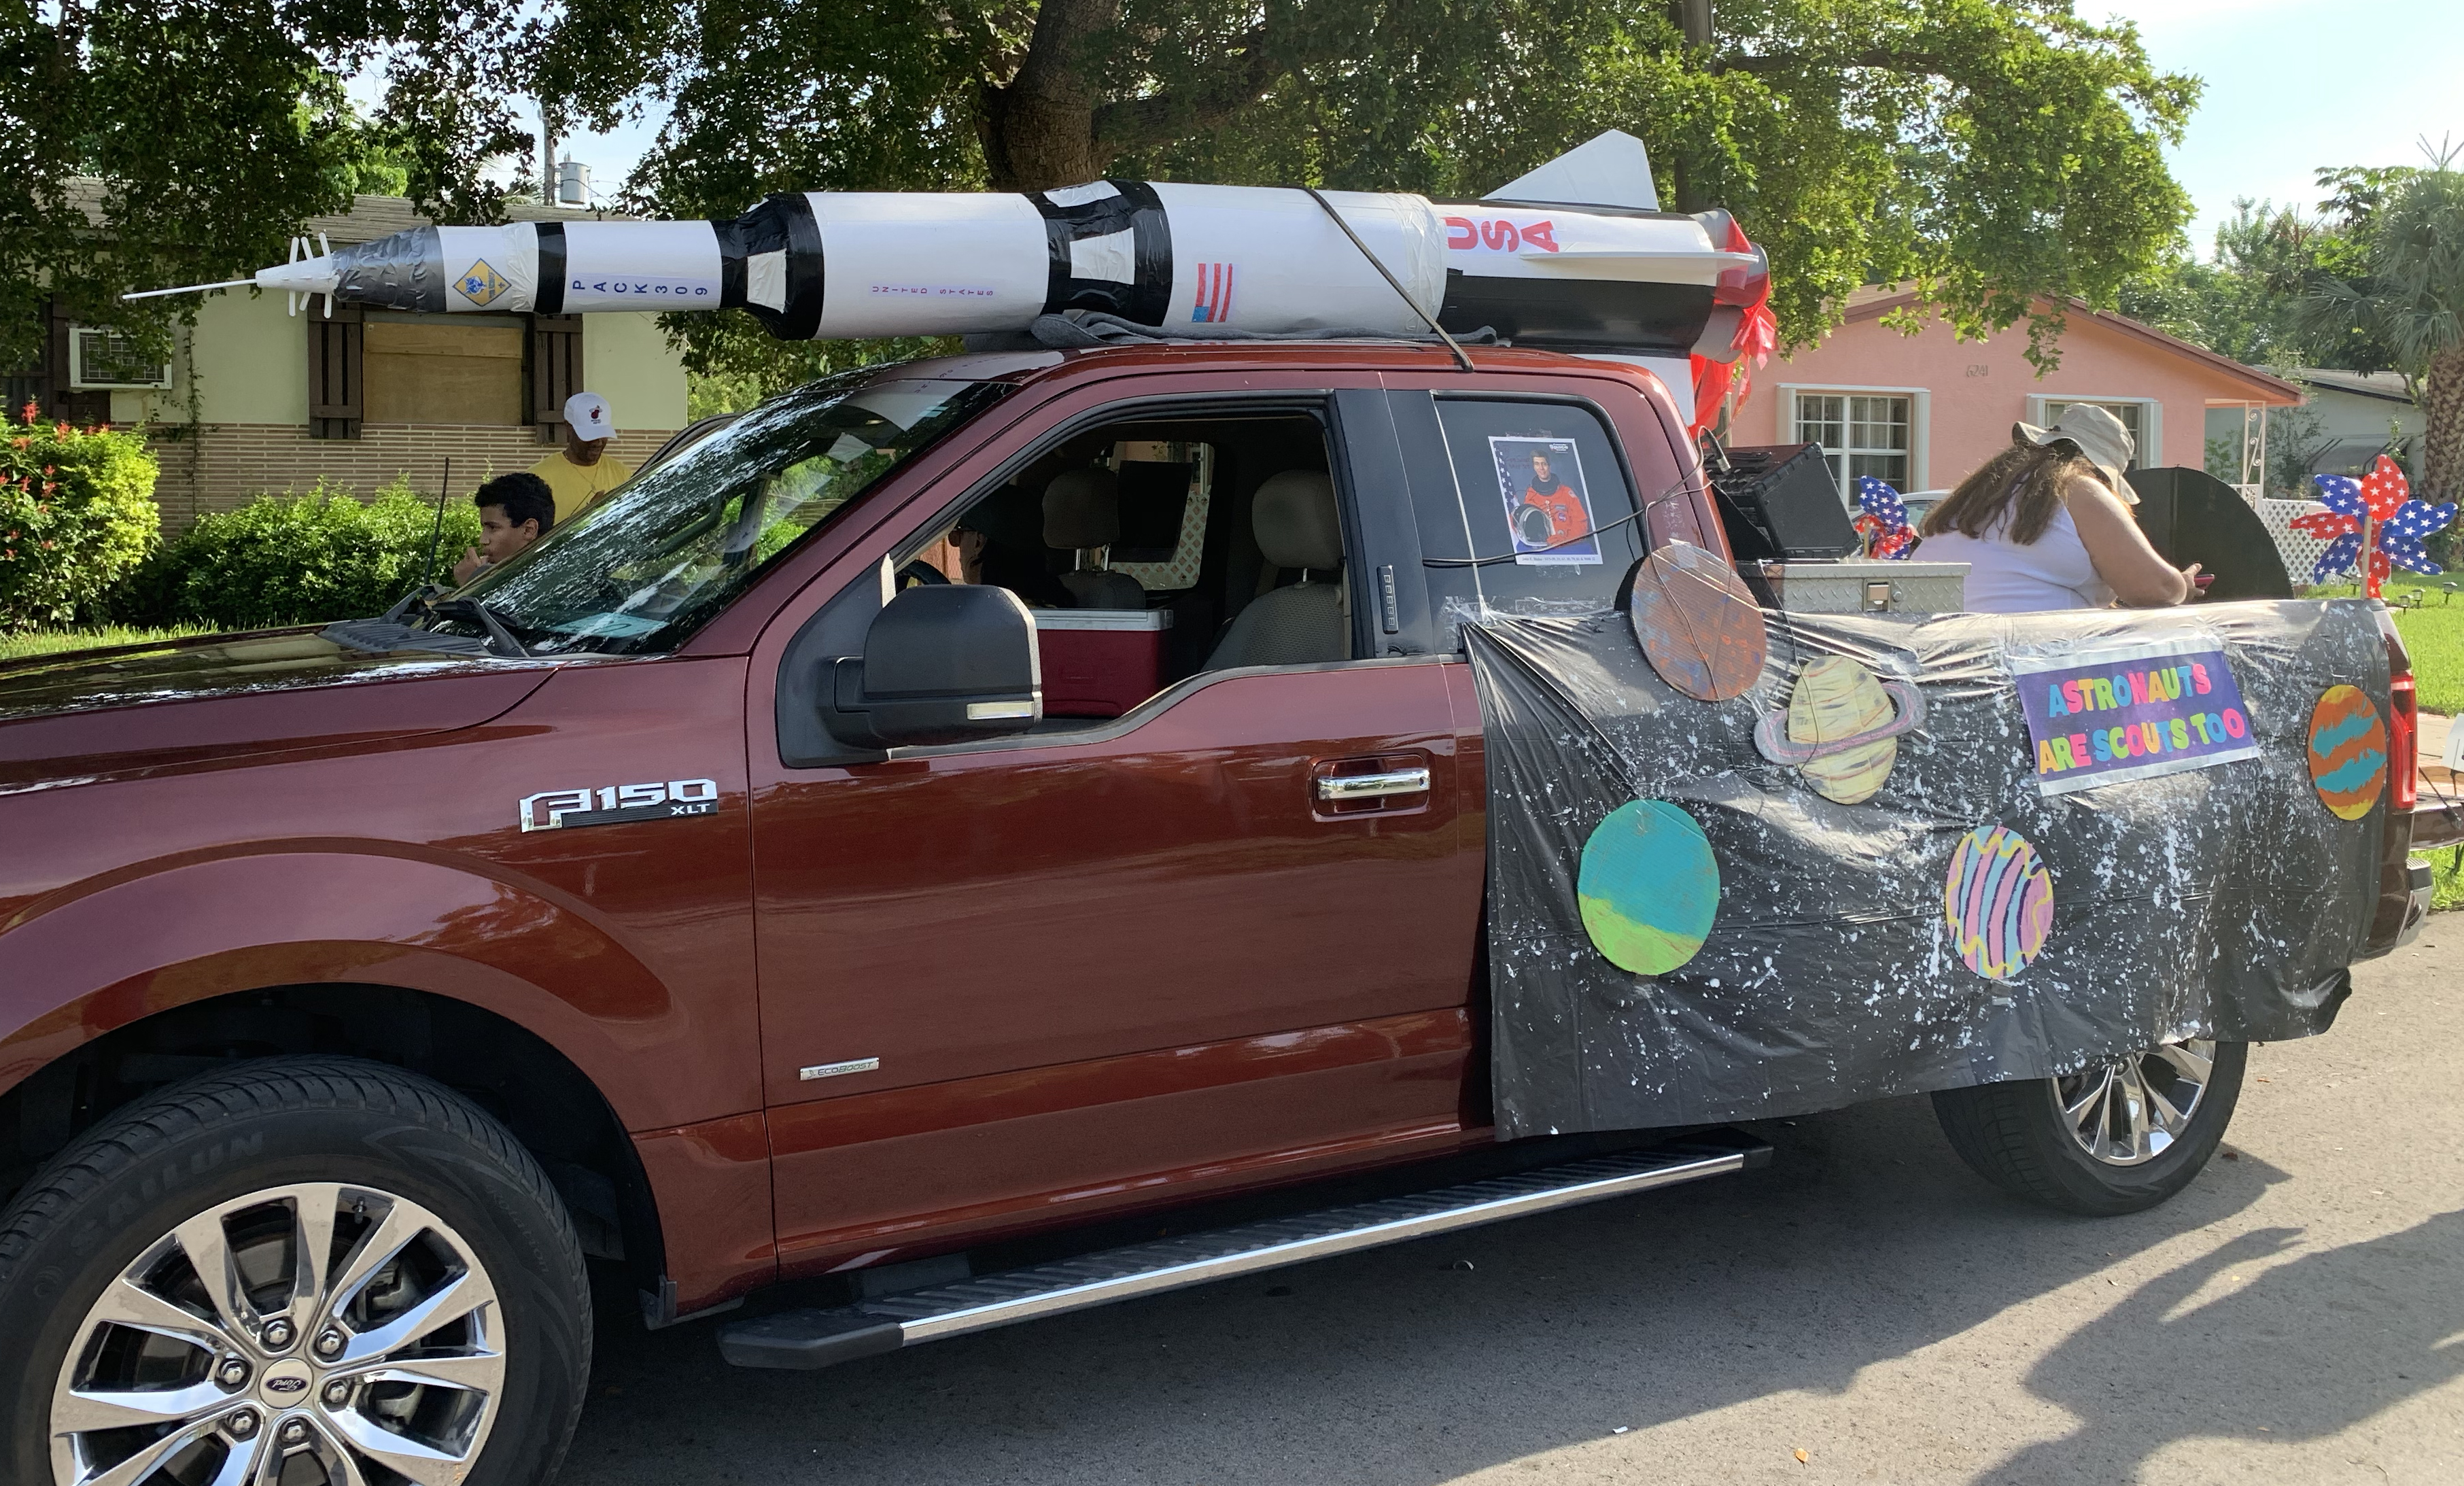
Our Cub Scout pack participates in the annual July 4th parade each year for the City of Sunrise. This year’s theme was “Not all Superheroes Wear Capes.” Another mom and I had the idea to honor the military. But when I told my son, he suggested we do something space-related as our pack had recently gone to Kennedy Space Center for an overnight field trip. Great idea, right?
So we came up with this awesome concept of a shuttle and making planets out of cardboard. I had high hopes of building a real space shuttle that a kid could ride in — based on some Lego cardboard costume video I saw on YouTube.
Yeah right! Reality came crashing down when I realized there’s no feasible way of building anything like this costume. Nor do I have the patience. *Laughs at self*

The initial build
After three failed attempts to go to Hobby Lobby (side note: I really need to Google their hours prior to leaving the house), I found a roll of rabbit cage wire at Walmart, along with $1 gray, plastic pots that would serve as excellent boosters. I also bought white poster board for the sides of the rocket, and discovered white Duck tape. This was easily becoming a cheap $25 project.
Bribed with Starbucks, my sister helped me figure out how to make the first booster. I realize it’s probably not called a booster, but just go with it.
We used a cake stand to cut out large circles for the top, middle and base of the cylinder. To make the discs thick enough, we used hot glue to fasten three cardboard circles together. That’s one handy tip I got from the YouTube video! The circles would be held in place using string tied to the cage wire. For extra stability between the discs, any leftover cardboard and Christmas paper was stuffed inside the cage. We put duct tape on the sides of the wire so there was something for the white duct tape to hold onto once we put the poster board on the cage.
Once the first section was done, we moved onto the medium cylinder. The plan was to have 2 large cylinders, a medium cylinder and a small cylinder all connected together to make up the basic shape of the Saturn V rocket. The wire would be bent to create the cone shapes that would connect the pieces together. We recycled my kids’ toy buckets to use as a base to prop up the smaller cylinders. As there was no way to create a smooth surface with the cardboard, we just wrapped the cone shaped connection with duct tape, almost papier maché-ing the connection.


Preparing for launch
The pack met on the Saturday before the parade to help put together the bulk of the remaining float decorations.
I cut out a large circle of cardboard, stenciling out the shape using the string method (tied a pencil to one end, and hold the other down to draw a semi-circle). The kids painted two of these cut-outs for our moon and earth. I glued popsicle sticks and old paint stirrers on the back of the cardboard for extra support, and another parent bought magnet tape to help us put it on the trucks. I painted all the cardboard cutouts with a layer of Modge Podge to help repel any moisture if it happened to rain on the day of the parade. Because it’s Florida.
The kids flicked white paint on black plastic tablecloths to mimic a starry sky. They also painted their own planets on smaller cardboard circles that would hang on the tablecloths off the sides of a truck.
Another mom brought dry ice that would act as our smoke for the rocket. She took a Dollar Tree container and attached an aquarium tube on the side. The free end of the tube is inserted into the side of the last rocket base and through the bottom so it nestles between the four boosters. We did a test run and put the dry ice in the container with hot water. Another mom suggested the “fire” of the boosters be made of red cellophane strips taped onto the insides of the gray pots. It looks so cool but I’m still kicking myself for not remembering to take photos or video of our test launch.

Final preparations
There was still a bit of work left on the rocket before the parade. I created the smallest cylinder and the final base, along with the top of the rocket before the build. A foam cone acts as the top, and a wooden dowel as the spire. Wooden popsicle sticks were inserted on the sides to finish the look. After the build, my kids painted these white. Then we glued letters and the Cub Scout logo on the rocket. My daughter drew the American flags, which we also glued and taped onto the rocket.
For the fins, I cut out a template from cardboard, and proceeded to cut 11 more shapes. Just like the inner discs, I glued three triangles together to form the fin. White duct tape covers the edges, and then a combination of hot glue and various tape attaches the fins to the rocket base. Because of it’s final height, the base could not be attached to the rest of the rocket until the day of the parade.


Liftoff!
On the day of the parade, everyone’s excited to decorate the truck. The dad who donated the use of his truck hoisted the rocket onto the top of the cab, and secured it with a strap. My husband drilled screws into the boosters as the glue failed us that morning (damn Murphy’s law). We draped the tablecloths on both sides of the truck, and taped the planets on them. I found a galaxy poster board, which I cut in half and made two signs that said “Astronauts are scouts too” and we put them on the sides of the truck.
The moon was placed on a tool box just under the rocket. The earth was large enough to sit on the truck’s tail gate, and another dad happened to have a cinder block to weigh the earth down (ha! Get it? Our own form of gravity!). Two moms sat in the truck to pass out candy and get the dry ice ready once we reach the Mayor’s stand at the end of the route. Our plan was to do a countdown and scream “Lift off!” at the end and time it so the smoke would come out of the boosters. Unfortunately, the dry ice wouldn’t cooperate no matter how hard we tried. Chunks of dry ice was placed in the boosters. We tried to use the warmest water we could find, but in the end it just wasn’t hot enough to get the smoke really going.
Our final descent
At the end of the parade, I let the kids stomp and destroy the rocket. I just didn’t have the space to put a nearly 14-ft. paper rocket, and I definitely didn’t have a way to bring it home safely. It’s strangely satisfying watching the kids stomp on it. That act brought them joy, which in turn makes me happy in a weird sort of way.
But hey! As awesome as it was, we still won an award for our float! We pick up our youth-participation plaque at the next commission meeting in August. And I can say with pride that my both of my float designs are award winners.
On top of that, the local newspaper (and my former employer) covered our float build, featuring our pack in both in the Sun Sentinel’s Local and Community section. How awesome is that?

No Comments